Sunday, July 21, 2013

How I Made MY Colour Blocked Top


I just posted my Saint Laurent inspired top on SewPassionista by DIANA. In this post, I want to show how I made it.


Here is my top,


Here is my drawing from which I drafted the pattern (based on Vogue 8792)


The top is slightly different from the drawing.

First, I copied the front of  V8792. Then I drew the design on this copy.


       I cut out the different sections.


I decided that I would add 1/2" seam allowances and drew these directly onto the fabric before cutting each piece out.


I wish I had taken photos of the sewing steps but I didn't.

I sewed the  five right side pieces together, then the three on the left. I then added the long perpendicular black piece. It was as simple as that.

I decided to make the back side all in yellow rather than follow my original drawing, Simplicity is usually best after all.

I had planned to add black neck and armhole bands but I changed my mind and used facings instead. I wanted these facings to stay put so I hand stitched them very carefully to the inside so that the stitching is virtually invisible on the outside of the garment. This was made possible by my fabric, which is a stable and fairly weighty cotton knit.


To hold the back neck facing, I added a checkered patch incorporating the four colours of my top for a nice little touch,


I used a double needle for the tunic length top and I was finished. This went together very quickly and easily.You can see a few more pics here.

I can't wait to try colour blocking on another garment This was fun!

I'll show you how I made the palazzo pants I mentioned in my last post in a couple of days.


Thursday, July 18, 2013

Making Silhouette Patterns Yoga Pant Three Ways


 I try on this blog to share knowledge and techniques.In this post, I want to share a great pattern: Peggy Sagers Yoga Pants pattern  3400  .


This pattern is one  that I keep using over and over again. I change it up in various ways. I add pockets. I shorten it. I use top stitching. I widen the legs. It goes on and on!

I made my first few pairs last summer.

I then used it as the main project for my sewing class this past winter. I managed  to measure seven ladies, draft a personal, individualized pattern for each, and after a few tweaks here and there (I insisted they had to make a muslin first) all seven ladies were delighted with their Yoga Pants.

This was all because of this well drafted pattern and Peggy's many webcasts from which I learned how to make various alterations.

I've made stretch denim Yoga pants, stretch suiting Yoga pants, and of course ponte Yoga pants. I've also made them out of stretch velvet and stretch cotton sateen.

This summer, I made three  pairs using summer weight ponte.

For the black capri length, I added an in-the-seam pocket with a zipper closing to the right side so I can take my phone when I go walking alone in the woods. I'll blog about the top I'm wearing on Sew Passionista this weekend.


.

I made a cream full length pair .


But my most favorite ones are the white palazzo pair I made that goes with so many things like this .


and this


and even a casual top like this one. I love the inseam pockets I added to this pair.


They feel wonderful and elegant. I'll be making more just like these.

If you're looking for a really great pants pattern, please consider trying this one. You'll be glad you did!
Check back early next week and I'll show you the changes I made to the pattern to make palazzo pants and I'll also show you a great in seam pocket technique which is slimming and attractive.

More later from


Sunday, June 23, 2013

Not Quite Enough Fabric? A Solution!

It happens to us all I imagine. Almost but not quite enough fabric. Sometimes it's in length, sometimes in width, or somewhere in between.

It happened to me this week when I was making this Vogue maxi dress I just blogged about on SewPassionista by DIANA.

The front top crosses over and I was missing just a bit at the  point on the bottom. I made sure  that it was the left side that would be deficient because that part would be completely covered by the right bodice piece and proceeded to add some fabric in this way.

I overlapped a piece of fabric making sure I matched the pattern and cut out the left front. It looked like this.


I then used a multiple stitch zigzag on the very edge of the added piece to join it to the rest of the left front bodice. I could barely see where I had joined the two pieces. I held it up against the light and even then it was almost invisible. See?


I guess my point is that we agonize over every little thing as sewists. In this case, the left bodice front is covered anyway. But no one is ever going to examine our garments as closely as we do so let's just lighten up.

Here's the finished bodice and it's fine. 


Thanks for stopping by. Have a a great week. More later from


Sunday, June 9, 2013

A Lace Dress,1966 and a Lace Dress 2013

This may be silly but since it appears my Google followers anr still not receiving my feeds from Sew Passionista by DIANA, I'm going to publish this post on both my blogs ,just this one time.because I think this is a good one.

What woman doesn't like lace?

I thought I'd show you the only lace dress I've ever owned.....my prom dress from 1966!! I've kept it all these years. It's very teeny weeny! Sigh!


I still love it and can really understand why I chose it all those years ago. From the salmon coloured taffeta underskirt/lining, the organza layer, the gorgeous white lace,  to the beautifully scalloped border of the lace running down the back, it still gives me a thrill.


I couldn't make my dress form small enough so I couldn't zip it up but closed it enough to show the lovely back.


My 1966 prom dress is not in perfect condition. It has spots and discolorations and even some wear and tear. It was worn to a couple of formals, as a bridesmaid dress, as a costume for a High School drama production at the school where I taught and even as a Hallowee'en costume by my then teenaged daughter.
But pressing it and seeing it on Antoinette has made my heart ache a little for my youth now long gone.
But enough of that.

Lace to me is very dressy and formal and I've been wanting to make a lace dress ever since it started popping up everywhere in the fashion world including the blogs we all love and follow. ( Examples include Diary of a Sewing Fanatic and Amanda's Adventures In Sewing.).

We were  attending an event  that was  perfect for a lace dress and since I had a beautiful navy stretch lace in my stash, I decided it was now or never.

My pattern choice had to be New Look 6000    because the fit was so great in the View B version I just made and showed here. This one would be View A.

I decided to use a black lining although I considered a nude lining, but I knew I'd be more comfortable as an older woman in the more conservative navy/black combo.I left the elbow length sleeves unlined however.

Here is my dress.


The true colour is more like this


My 16 year old grand-daughter thought it was beautiful so it must be OK, I guess.

I cut the dress and sleeves so the scallops, which formed both selvedges, finished the hems.


 That made it so there is more stretch going down the dress than there is across,but that didn't cause any problems. The zipper, which I of course stabilized, did buckle a little but that's in the back and if I can't see it, it must not exist,right? Lol!

I'm very happy with my lace dress ,2013. Of course it doesn't have the magic that my 1966 prom dress still has for me, but then,  at the risk of sounding really corny,my life  after all has really ended up like a fairy tale and I don't need magic anymore.

I wanted to show you a real life shot of my husband and me at the event we attended but I forgot to have a photo taken! Darn!


I hope you will let me know what you think!

More later from


Sunday, June 2, 2013

View C of Butterick 5645, Much Better

Because I'm still not getting any traffic on SewPassionista by DIANA.,I'm going to start posting here instead for a while. Please if you would leave  a comment so I know I'm not invisible!! Lol!!

I made View A of  B5645 expecting to love it but the pattern had some flaws and I ended up feeling blah about it.

 I was going to file it away when I suddenly decided to try View C. I had a piece of printed lace that really wanted to become this top and so two hours later it was finished!


The sleeves of this top require an inset .I rather hastily decided to use a dark blue stretch lace I had on hand. I now wish I had chosen a white or beige lace instead.


I love this top and it will be perfect to wear with white palazzo pants to a barbecue that is also an anniversary party we are invited to. (  I don't have white palazzo pants but will have to do something about that.)

For now, it goes rather well with my white ponte yoga pants, I think.


I have a great post about lace dresses for next time. It includes my prom dress from 1966 which still makes me swoon a little. Please check back in a couple of days!

I hope you found time to sew this weekend.

More later from


Sunday, May 12, 2013

How I made This Cardi With a Twist.

I just posted this outfit on Sew Passionista by DIANA. Please visit if you want a more detailed look.


I thought someone might want to know how to make this really simple topper because when I wore it last night to a function ,several people complimented me and wanted to know how I got the twist  in my cardi.

I have a pullover which looks like a twin set and I wanted to copy just the cardi part so I figured it out and came up with this pattern piece for the front.The little part in the middle front that sticks out is about 2.5 inches wide when laid on the fold by about 5 inches deep.


For the back and sleeves , I used Simplicity 2603.

I didn't know exactly how to cut it so that when twisted, I'd end up with both sides of the front being on the right side of the fabric ,so I made a miniature front . When twisted twice, it came out the right way so I was confident it would work.


The front piece is cut on the fold as I said..


It is then twisted twice, and sewn as usual at the shoulder and side seams, etc.


To finish the front edges I serged , then used Steam-a-Seam to hold down  the folded edges before stitching by machine. It worked beautifully. On the original, the edges were folded twice before being stitched but I didn't want to do that.

I cut the back so I would have a. nice deep hem.

I added elbow length sleeves which I  like for summer days and in just a couple of hours, I had  the perfect topper for my new dress.


I think you could use different knit fabrics both light and heavy to make this piece. 
You can bet I'll be making more. 

Happy sewing!


Sunday, May 5, 2013

Just Checking


I've been trying to figure out why people have stopped commenting on my Sew Passionista by Diana blog. I reset a few things and have signed up to follow this blog to see if it appears in my Reading list.


Riley at 3and 1/2years old


Her baby sister Poppy at 11 months.

So here goes. If this doesn't work I give up.

Thursday, April 11, 2013

The Great British Sewing Bee

Thanks to Ann of Ann's Fashion Studio, I've just finished watching Episode 1 of the GReat British Sewing Bee and I so love it. What a trhrill to see Ann Rowley on whom I've had a sewing crush for years and Tilly of Tilly and the Buttons as contestants.

If you haven't seen it it, check it out. I promise you will love it! Here is Episode 2 as well

Sunday, March 24, 2013

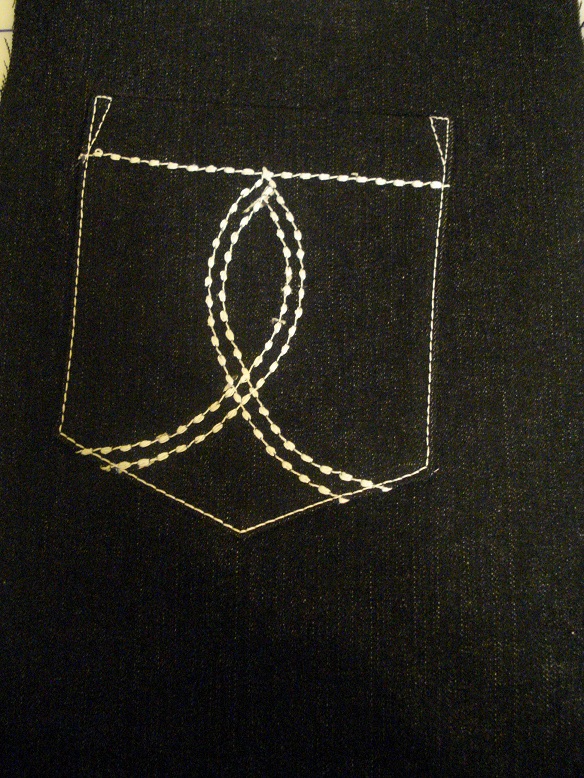
Designing a Jeans Back Pocket

Since I can't seem to find RTW jeans that fit me well, I've decided to give up and just make my own. I already have made several pairs so it doesn't take me nearly as long as it used to.

I enjoy dreaming up designs for the back pockets so I thought I'd show you how I go about it.

The hardest part is thinking up a suitable pattern that will look cool on the behind!

I've been more successful on some


than others.


For my new black denim Yoga Pant jeans, I came up with what I think is my best one yet. Now, I probably saw this somewhere but I don't know for sure .


First, I make a paper copy of the finished  pocket.I draw my design on this paper pocket.


I then trace two copies onto tissue paper.


I pin the tissue directly onto the pocket.


I stitch directly over the tissue using top stitching thread or two spools of regular thread threaded in the same needle. I use regular thread in the bobbin. (no photo )

I tear off the tissue which comes off easily and finish the pocket as usual.

On these pockets, for the design, I used a decorative stitch called saddle stitch on one of my machines and sculpture stitch on another machine.


I love my new Yoga Pant jeans. I worked very hard to refine the fit . I solved a couple of fit problems That I had with this Silhouette pattern. I intend to write a post here to show my solution in case someone else has the same issues.