Sunday, March 24, 2013

Designing a Jeans Back Pocket

Since I can't seem to find RTW jeans that fit me well, I've decided to give up and just make my own. I already have made several pairs so it doesn't take me nearly as long as it used to.

I enjoy dreaming up designs for the back pockets so I thought I'd show you how I go about it.

The hardest part is thinking up a suitable pattern that will look cool on the behind!

I've been more successful on some


than others.


For my new black denim Yoga Pant jeans, I came up with what I think is my best one yet. Now, I probably saw this somewhere but I don't know for sure .
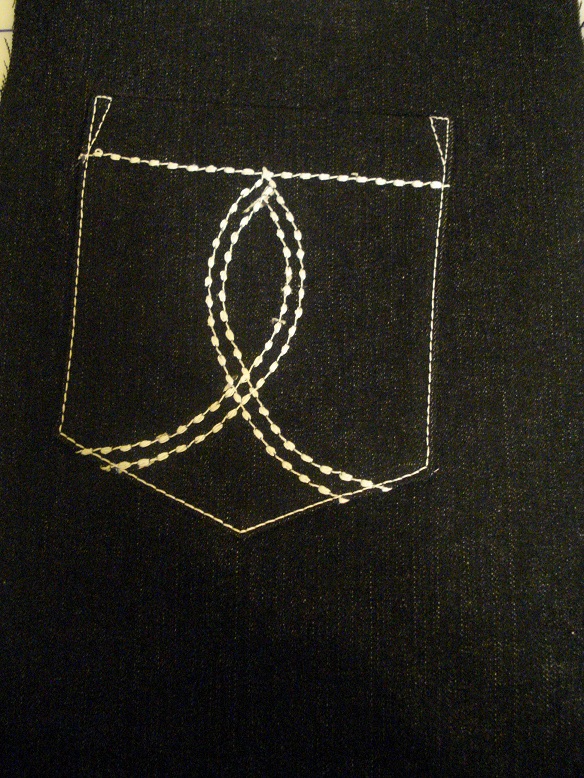

First, I make a paper copy of the finished  pocket.I draw my design on this paper pocket.


I then trace two copies onto tissue paper.


I pin the tissue directly onto the pocket.


I stitch directly over the tissue using top stitching thread or two spools of regular thread threaded in the same needle. I use regular thread in the bobbin. (no photo )

I tear off the tissue which comes off easily and finish the pocket as usual.

On these pockets, for the design, I used a decorative stitch called saddle stitch on one of my machines and sculpture stitch on another machine.


I love my new Yoga Pant jeans. I worked very hard to refine the fit . I solved a couple of fit problems That I had with this Silhouette pattern. I intend to write a post here to show my solution in case someone else has the same issues. 


Sunday, January 13, 2013

The Making of a Trench

I made a trench coat for my DD as a Christmas gift. I posted it on Sew Passionista by Diana. I thought I'd give the construction details here.

I used M5525. The fabric is a fur backed denim and so I had to really think about how to achieve the look I wanted. It helped a lot to dig out my grandchildren's
 crayons and to colour the pattern illustration.


And here's the finished coat.


First I decided that I wanted exposed seams along the princess lines of both front and back but the side and center back seams would be normal

I new the lapels had to show the denim on the outside so I drew the roll line , cut along it, added a seam allowance to both the lapel and the front ..


When I sewed the two together, I realized the lapel was too scanty.


I had to recut it and this time I added another 5/8" to the lapel and that was much better. When I added the collar, I decided to leave out the collar band and that worked just fine.


Now about the exposed seams and as you've probably noticed the outside finish of the collar ,center front,hem , cuffs and belt.

First thing was to separate the denim from the fur on all edges. This was time consuming and hard for a woman who has sore thumbs but it was worth it.Then I trimmed away about 1/2" of the denim.


I then top stitched using a zigzag stitch 2.5 wide and 2.5 long. My awl really came in handy for this step.


For the hem and cuffs. I met with a problem at every seam that was sewn the regular way. These pictures show how I dealt with that.

 I clipped,trimmed away the denim.


tacked down the fur to one side ,


then turned up the hem and top stitched in place


The pocket on this pattern are in seam. Here is how I managed the opening.The exposed fur was a challenge here!


The pockets on the inside. I used a piece of denim for the lining.


The side and center back seams were top stitched like this.


Since the belt ended up quite wide, instead of belt loops, I sewed it at center back like this.


As for buttonholes, I forgot to take pictures but I used a sort of bound buttonholes which left a bit to be desired.

And that's it.My daughter loves her trench and it fits her beautifully.


Monday, November 19, 2012

The Making of a Vest...Kwik Sew 3717

The vest in this post is different from any other vest I've ever made. It is Kwik Sew  3717
 K3717
Line Art
 That's all there is to it. One piece not counting the belt.

There was no suggestion as to what fabric to use so I had to experiment.

I used a medium weight knit....


a quilted denim...


and a faux suede.


The collar of the knit fabric was floppy so I lined the vest with a plaid Ponte knit which helped. I also used the plaid as armhole facings. 

The armholes were too big and roomy 


so I filled them in like this.


This was my muslin and I can't really wear it like this but that's OK.

For the quilted denim vest I drew the armscye to be 21" on my pattern and that was a good size for me.

Because this fabric was stiff, I cut off about two inches from the top or collar section of the pattern so the collar wouldn't be so high.I just simply started at about chest height and gradually cut as I went around the curve and straight across the top.


The sides of the vest stuck out a lot so I straightened the sides by sewing a seam (on each side) which cut off two" at the bottom and ended with a 1/4 inch seam at the top (or under the armhole).This reduced the flare by four inches on each side.

Then I did the same thing at center back to take off another four inches. That worked out just right.


I finished the entire vest  and the armholes with fold over tape.I added pockets, toggle buttons and buttonholes for a very unique style of this Kwik Sew pattern.


For the faux suede vest, I decided to double it (or self line it). That was not an easy process becuse it was very important that both sides be exact and that each stay put and hang as one.

I decided to cut the two layers at the same time but to wait before cutting out the armhloes until I had the outsides sewn together and then turned to the right side and pressed . I then cut out the armhholes together after making certain that the two sides were exactly smooth. I pinned and basted together and then I used a bias binding to finish .


To tame the flare this time, I added a casing and inserted elastic. That worked beautifully.


I had lots of fun trying out these samples. I hope my Sewing Group will want to try one.
 Why don't you make one? Try downloading a copy of this pattern like I did.  Very convenient !

Happy Sewing from 


Sunday, November 4, 2012

Adding a Bias Cut Draped Collar

I made a warm, draped collared  pullover and posted it on Sew Passionista and I thought I'd explain how I drafted the draped collar.


I used Vogue 8605 for the body and sleeves with alterations done on the front piece and to add the collar, I proceeded in this way.

I scooped the neckline from three inches in from the neckline along the shoulder seam down  to mid chest on center front like this.

Step 1


Step 2
On a piece of paper


Step 3 & 4
I slashed and spread this line adding about 8" to the width of the neckline/shoulders


Steps 5 & 6


Fold the collar in two and sew into neck line of front piece. ( Don't forget to add a new seam line to the neck edge of the front)


The collar does  not extend to the back neck.


And that's all there is to it!


 I want to make a nice red top using this draped collar. I've always admired that kind of neckline but because  this style is cut on the bias, I find it hugs the chest in a way that looks too tight. This method is my alternative.


I hope my instructions are clear and that someone out there will give it a try.
More pics here!

Thank you for stopping by!