Tuesday, July 4, 2017

Diana's Top


I'm posting this as a back up for my Sewing Group to refer to if they want to make one of theses tops out of class.

Directions For Diana's Top  

About cutting out your top

***  Lay your fabric on cutting surface by folding it right sides together with selvedge of each side  together as well. It's very important that the folded edge be smooth. You'll have to work and refold the fabric until you get a smooth fold. You may have to cut off your selvedges to make this happen.Don't worry if the selvedge end is not exactly together.

*** Lay your pattern on the fabric. Don't forget to measure the distance between the STRAIGHT OF GRAIN AND THE FOLDED EDGE AT SEVERAL SPOTS TO MAKE SURE YOUR PATTERN IS LAYING STRAIGHT.

***Use weights rather than pins to make your job much easier.

***  Check your stitch length. It should be at least 2.5 or 3 because you are sewing on knit fabric.DIRECTIONS:

Step 1... Cut out the top being careful not to let the fabric move out of place. Cut little snips at the dots along the pleat area. mark where the fold for the pleat is.
Take away the pattern but don't move the top.


Step 2...  Pin the lower half of the two layers together from just below the armhole to the hem.


Step 3...  Fold back the top layer of the upper half. Lay the FRONT NECKLINE TEMPLATE  on the neckline of the bottom layer matching the notches at center neckline.. Cut out front neckline.


Step 4...  Pin front and back shoulder seams together  .


Step 5...  Sew shoulder seams using a 1/2" seam allowance.  ( DO NOT SEW THE SLEEVE                          OPENINGS TOGETHER ! ASK RUTH AND ALEXA WHY !?!? )
               Serge finish the shoulder seam and neckline.

.


Step 6... On both sides,Sew side seams as far as point A . Don't forget to back stitch for this and the next two seams.


Sew from  A to B


Sew from B to C.


                Serge side seams but only to point A.


Step 8... To form pleats,   WITH THE WRONG SIDE OF YOUR TOP FACING YOU,  fold pleat at fold line and bring point (A) to second snip. Sew the pleat in place following original seam line. Do this for all four pleats.


THE HARD PART IS DONE. TAKE A BREAK!

Step 9...  Finish neckline by either folding neck edge 1/4 " and top stitching or you can use Steam-a Seam.


To hem sleeves and bottom of top, first apply Steam-a-Seam to stabilize the hem area.
Sew hems using either a twin needle or  a straight stitch.

That's it. You're finished. I hope you like what you made and that you had fun making it !!

Sunday, January 22, 2017

The Four (or Five ) Way Wrap

I know it's been a very long time since I posted here but I think you're going to love this little tutorial.

If you go  here to  Sew Passionista, you'll find many photos of this amazing little workhorse of a garment and hopefully get inspired  to try one. You will need less than an hour to sew this wrap and will wear it  constantly, I promise. So here is one example


Instructions:

Fabric....  Amount : 20" to 25" of  at least 60" (150 cms. ) wide
                 Type : a drapey fabric , preferably a knit but wovens will work if  they are light weight
                            such as georgette. Knits can include sweater , crochet, jersey, ponte, mesh, lace,
                            boucle, etc.

METHOD.... (You may find the chart I've includeD helpful )

       Before you begin, take a look at your selvedges and decide if you like them. They can become a finished edge. Other wise , if you have a serger, prefinish all edges before starting to sew your wrap together.

                 1... Fold your fabric with right sides together  selvedge to selvedge

                 2...Place a pin 15" from fold .This is your neck opening. Sew from pin to the selvedge.

                 3...If desired, fold neckline seam allowance and top stitch. .
                       You could leave this seam as a serged edge if you want.

                 4. Press your seam and you're finished !

This is a chart I made to use for my Sewing Group. I hope it will make the instructions more clear.
Excuse the photography.


OPTIONAL:. Add buttons down the seam or an exposed zipper for a funky design detail
                       Finish hems with bias binding to add some oomph to your wrap.

              .

                Fringe the hem or sew on a fringe for a really cool  finish.


                Come up with your own idea for a unique wrap .

  I hope you'll try this great little topper. It's a lot of fun to wear and adds pizazz to any outfit.

Until next time from


Sunday, August 21, 2016

A bright Yellow Surefit Designs Top


I'm really interested in rotating darts at the moment and have been practicing by making simple tops. For the one I'm showing today , I opened up my DD bust dart in both the shoulder and center front areas. It's a simple process if you have the patience to make a copy of a pattern and to work methodically. There's quite a bit of cutting ,spreading, and taping involved. For more details if you want them, go here to Diana's Sewing Lessons.

For my top, I redrew my Surefit Designs sloper in a smaller size by going down a dot. With SFD, you use the bust dart size you need  ( in my case a DD ) so there is no need for a Full Bust Adjustment but you make all your other adjustments, e.g. Rounded Upper back, and Sway back. I've found that there is no need for Narrow Shoulder adjustment and I only need a minimal Sloped Shoulder adjustment for this system.

Here is what my pattern front looks like before and after rotating the dart. For the designed top I lowered the neckline 5/8".


I added about 1 1/2 " to the width of the shoulder in addition to the spread where I opened the bust dart so I had to add the same to the back shoulder. I shirred the front to fit the new back shoulder


To know how much to gather the center front, measure the CF seam from neckline to hem before you open the dart. Once opened, the CF will spread.  Gather the area where you spliced and spread until the center front seams are equal to the original measurement. (I hope that makes sense ! ) I should also say that you don't need as many slices as I made Probably one would be sufficient at the CF bust line.

I also moved  half the waist darts in both front and back to the side seam  instead of sewing a half dart. I wanted a slightly fitted  silhouette. To do this, I traced the waist dart ,cut it in half lengthwise, then lay  it on the side seams and trimmed that amount from both front and back.


Before I started my top , I used Sally Silhouette to design a top I thought would go well with last summer's fun palazzo pant. I gave the Sandra Betzina top to my DGD because it was too fitted for my taste.


I curved the CF seam at the bottom by using my Design Stylus.


I turned the hem under 5/8" in the front but for the back, I sewed a 1 1/2 " facing because I cut it a little too short

This photo is a little pale but it shows the shirring at the shoulders and CF where I opened the bust dart.


The back is just plain.


Here's an "action " shot taken at our Family get-together which we hosted.


Now as for the topper, this is what I planned to do.


I changed my mind when I started to draft the pattern and I don't love the result.  I drew a complete front  ( both sides ) and drew a line from the neckline to the opposite lower side.


The polyester lace is not drapey enough and is a little too thick to tie at the waist nicely but this is what I did to the front  bodice. pattern. I lowered the neckline in both front and back about an inch and that was a bit too much for the back neck.


Here is the " cardi"with this remodeled  10 year old dress that use to look like this .


This bright yellow top goes with a lot of my bottoms , especially this Rachel Comey skirt made for my trip to Paris last September,


and of course my wild and crazy palazzos. ( I admit the pics are quite washed out. I didn't pay attention to the settings !!)


I'm using my SFD sloper to check the fit of all the patterns I'm sewing up. It's a great fitting tool. For example I used it to check the fit on the pattern I used to make my reunion dress which I blogged here I was able to determine that I needed only a slight FBA and that I needed to narrow the shoulders a bit, etc.

If you're like me and are determined to make your clothes fit as well as possible, do give Surefit Designs a try. It isn't at all hard to use and it's a lot of fun to learn something new ,in my experience

Happy sewing from


Sunday, June 19, 2016

One Layer Side Seam Pocket

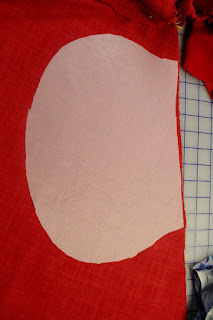
The pockets on this coat made using Sandra Betzina's pattern, V1494 are my favorite version of side seam pockets.


I prefer these because you end up with only one layer of pocket and they are less bulky than traditional pockets.


. Whenever possible ,I like to substitute the method I'll show you here learned from Sandra years ago when I made this coat using this pattern.


For this method, You'll use the same markings for the side pockets of the pattern you are using.

The shape of the pocket is up to you. In the coat above ,the pocket is quite large and the shape is angular. For the red coat, I used an enlarged version of the pocket included in the V1474 but I only cut one pocket piece for each side of the coat.


You'll also need to cut the pocket in fusible interfacing. Again, I cut mine slightly larger than my pocket piece for extra stabilizing (if that makes sense ).

The pocket will of course be sewn to the inside of the front of the coat  but first attached to the back side seam. So here goes.

Step 1  . . Iron the interfacing in place. is to iron on the interfacing to the pocket area on the inside front of the garment.


Step 2  (sorry no pic) is to run a little line of stitching across the circle marking which indicate the pocket opening on the side seam and then to clip to the circle and press the opening to the inside  and top stitch like this.


I chose to  finish the  opening edge with a bias piece of my lining fabric, but you could finish it with a serger or by folding in the seam allowance.


Step 3... Sew the pocket to the side seam of the back of the coat starting and finishing at the notches that mark the pocket placement on the side seam. Because I cut my pockets with a lighter linen in a different shade of red, I added a strip of the coat fabric to the edge of the pocket but this step is unnecessary.


Step 4... You can finish your pocket edges any way you chose. I  serged  mine but for an unlined garment I would do a Hong Kong finish..


Step 5...You're ready to sew your pocket to the inside front but it will be a lot easier with the help of Steam-a-Seam. Just be sure to apply it to the side of the pocket that will be against the coat ( ask me why I mention this !)  Press in place.


Step 6...Change your bobbin thread to a contrasting colour and run a line of basting stitches along the edge of each pocket.


When you turn to the right side you will have  a thread tracing to follow when you top stitch.


Note:To top stitch, whenever possible, I like to use a heavy duty thread by Gutterman but when that's not possible, I'll use two spools threaded through the same needle for similar results.


And that's all there is to it. I do hope this is clear but if you have any questions, please let me know in the comments section.


  You never know when I'll post again on this blog so if you're interested in what I have to teach, come back again sometime.