Friday, July 18, 2014

Sanfdra Betzina Sew-Along Session 2

Ok, so you've read the post on Bias Garments and have washed and prepared your fabric. now for the cutting out.

My best advice is to follow the layout plan included in the pattern instructions.

You do not need to cut out interfacing for the bodice front and back facings if you plan to do the chenille effect. The only piece that needs fusible  interfacing is the pocket facing. Do not apply interfacing until I explain what to do with it.


NOTE : The side of the facing that you want to peak through after cutting between the stitching lines should not be the side that lays against the marking paper. So if you want the right side of the facing to show through, the wrong side should be against the marking paper.

I used a large piece of waxed marking paper cause I love it and laid the facings with pattern still pinned over the paper and used a tracing  wheel.


Now it's time to draw the lines for the chenille effect. On both the front and back facing pieces, you will see a line to use as a starting point. In the second photo below, I made a second line 4" away because I had planned to stop there but later changed my mind. Then draw lines 1/2 " apart as far up and as far down as you want with your tracing wheel.


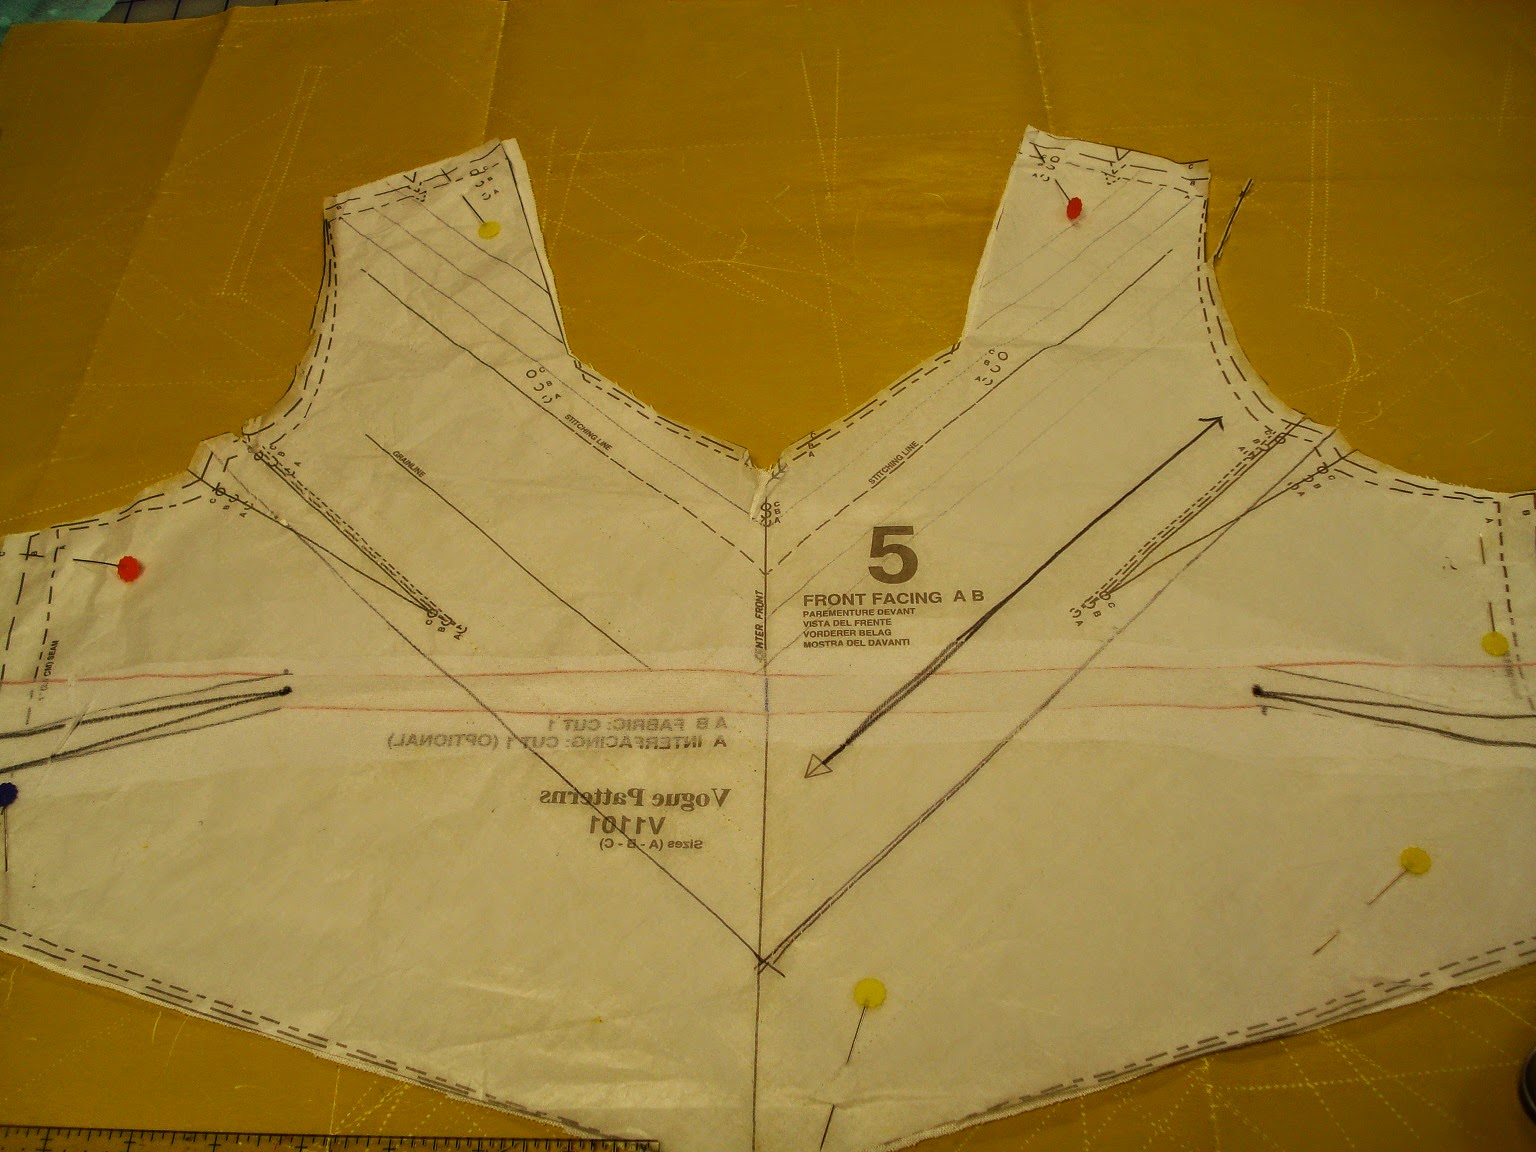
As well mark the darts. I did a slight FBA on mine so you see the side bust dart as well as the armhole one.
Oh and by the way, don't sew in the darts yet .They are only sewn after all the stitching for the chenilling is complete.


I decided to only do five lines on the back of my dress but you could leave it out completely or do the whole thing.


After marking everything, set this aside. You are now ready to start sewing the dress the first thing to do is the pocket facings. Remember. Don't apply the interfacing yet!

I'll do my best to post the pockets step by late afternoon, Donna and Karen!


Wednesday, July 16, 2014

Sandra Betzina Bias Dress Sew-Along ( V1101 )

This is the first in a series of posts to accomodate my sewing ladies. They wanted to make this pattern ,V1101, as a tunic for  a summer project.


 The pattern is Out of Print and is not available on the BMV website. But if you are interested,and own the pattern,  please join us and at the end I'll post all finished pieces at Sew Passionista by DIANA.
I made it up as a dress, took many photos along the way and will attempt to guide you on this bias garment journey. Here is my sleeveless version.


.


First let's decide on suitable fabric. On the pattern envelope , the list of suitable fabrics includes linen, silk, rayon crepe and lightweight denim. I'd like to add that this pattern will work best with a fabric with plenty of drape. My linen was medium weight and it hangs really well. You will need a contrasting colour for the facing pieces which show through when you do the chenille effect on the bodice.

Wash your fabric and for some pointers on bias garments, look here at my post based on techniques learned from Sandra Betzina herself. It includes how to iron your fabric to prepare it for your bias cut garment. 

You will be cutting this garment on one layer of fabric so don't fold it. If you are unsure about placing the pattern pieces on the fabric, each piece has a grainline drawn on it so use that as your guide and not the center front and center back lines. You will thus be cutting the pieces on the bias. ( So to clarify, the grainline on the pattern pieces will be parrallel to the selvedge, thus the center front and back will be on the bias. )


This will get you started on your way to making your bias tunic/dress. Leave the facing pattern pieces on the fabric because next time , I'll explain how to draw the chenille lines. Check back in a few days and I'll have the second post ready.

Have Fun!


Monday, July 14, 2014

Our Last Sewing Class and A Sewing Quiz

Note: I wrote this post two weeks ago but events in my life caused me to forget to publish.

I'm a retired teacher as many of you know and once a teacher , always a teacher I guess because I couldn't end this session of lessons without testing my ladies! I surprised them with this little quiz/review of the sewing techniques we covered in the last two months. I didn't include any of the fitting/alteration points  that we covered . I feel it takes a lot of trial and error before we can master those techniques.

Here is a list of sewing terms. Please choose from this list to fill in the blanks of the following statements. . You may need to use an answer more than once.

               basting stitches                                   stabilizer
               stay stitching                                       interfacing
               under stitching                                     down                                
               bias                                                      narrow                                                 
               5/8"                                                     shoulder 
               1/2"                                                     tear away stabilizer
               3/8"                                                      center
               one inch                                               stitch crowding
               fusible                                                  vertical
               Wonder Tape                                      Fray Check
               horizontal                                             underarm 
               Steam-a-Seam                                     stitch in the ditch

      1. For most pattern companies the traditional seam width is                               .
     
      2. To sew a Hong Kong finish to the inside seams of a garment use                          strips of a light                       weight fabric.

      3. The stitching that is sewn on the facing of a garment and through all thicknesses of the seams
 and just  beside the "ditch ' of the seam to help the facing turn to the inside of the garment is called
                      .

      4. To shorten the seam of an armhole or neckline it is helpful to sew with your finger
at the back of the presser foot to form little puckers. This  is called                                   .

      5.When inserting a zipper, always stabilize the back of the area with                     
                       .

      6.Stitching sewn at 1/2" along the seam allowance to stabilize an area  is called
                                      

      7.When inserting a sleeve,you should sew two rows of                           
                              between the  front and back  notches.

     8. The two spots that must be matched on a sleeve and bodice are the                            seam and the
                                      seam.

     9. It is important to finish a dart with a very                             point.

    10.Bust darts are pressed                               and waist darts in both front and back are pressed                     toward  the                            .

    11.Buttonholes are sewn                            inch from the edge of your garment. They are                       
         for shirts and blouses, and                              for jackets and coats .

    12. The technique where you sew  between the two sides of a seam and from the outside of your garment
         is called                                  .

    13. Two products helpful when sewing buttonholes are                                and                               ..

    14. A product that is helpful when applying a zipper is                            .

    15. A product useful when finishing a hem, cuffs, or positioning a pocket when you are sure you won't want to move it is                                    .


       Click here for the answers.

And finally, a couple of pics of my students with their made by them garments. I had intended to take more pics featuring all their finished garments, but left it too late . Darn!


             From left to right, Karen and Donna wearing their Sandra Betzina fluted blouse/jackets ( V1385) and Dorothy wearing her New Look 6762     knit top and her Silhouette Patterns yoga pants # 3400. Donna is also wearing a slim version which we developed of the yoga pants pattern.


Tuesday, June 24, 2014

Lesson 6...My Techniques to Sew Darts, Buttonholes, and Gaping Armholes

We're nearing the end of he sewing classes until the fall. For the past two weeks, I've shared techniques that are useful to a sewist and am combining them in this week's post.

Techniques for Successful Darts

1. Mark the dart clearly with chalk or some other type of marker. For bust darts mark the beginning of the dart by making little clips in the side seam.

2. To pin, place your pin in one side and come out  the other side.Don't close the dart yet.Go on to the next pin and so on  until you get to the point. The photos should help illustrate what I'm trying to say.


3.  Bring the dart together at each pin by pinching the sides together .


  I begin to sew at the wide side of the dart. Some prefer to start at the point.
  It's important to aim toward the point of the dart as soon as you begin the sewing process. 
  and that the last little bit before the end of the point is very narrow. Sew slowly!

4. Sew along the legs of the dart until you have about an inch left before the point. Reduce the stitch length  to a very small stitch. I use 1.5 stitch length. Finish the dart making sure the last half inch is very narrow. Sew off the fabric. Don't back stitch. The small stitch length makes it so you don't have to knot your threads.


   When sewing "fish eye" darts ( the kind that has a point at each end usually  used to define the  waist in both the front and back of a bodice) , it's best to start in the middle of the dart and sew to each end. This takes two steps but is worth it to get a nice skinny point at each end. 

 Waist darts  are pressed toward the center front or back and  bust darts are pressed downward.

 Here is an example of one dart sewn correctly and another that has too wide a point at the end. Notice the difference after they are pressed.


For those of you  (Dorothy) who prefer to learn through video, I found this one on line by Sure Fit Designs on darts.


My Techniques for Sewing Buttonholes.

It is very important to make a sample buttonhole or two on scrap fabric that has the same finish as your garment. If your garment has a facing ,your sample should also have a facing and the seam which joins the facing to the garment should be trimmed.
The rule of thumb is to make vertical buttonholes for shirts and blouses. and horizontal buttonholes for jackets and coats.

1. Apply fusible or sew-in interfacing behind the area where your buttonholes will be sewn.


2. Use a new needle on your machine. A  Sharp needle #70/10 is a good choice. You could go smaller for lightweight fabric.


3. Mark the placement of your buttonholes with a pin to begin with

4. Wrap and pin  pieces of tear away stabilizer over the area of each buttonhole.


5. Mark  each buttonhole 3/8" to 1/2" from the outside of the garment as in the photo below. The long line does not indicate the length of the buttonhole unless you don't have an automatic buttonhole feature on your machine. The line is to keep you stitching straight once you start sewing.


     The automatic buttonhole foot will make your buttonhole to the size of your button which is placed in the back of the foot. ( I find it will make it a little too long so I take the button out and lessen the length by pushing in a little)


     If you do not have an automatic buttonhole foot, the buttonhole should be the width of your button plus 1/8" or the thickness of the button.


As much as possible, let your machine do it's job without touching the garment too much. Sometimes you might have to gently straighten it but the electronic mechanism does not like to be tampered with!


6.After your buttonholes are sewn , tear away the stabilizer and run a line of Fray Check along the opening. Allow this to dry before cutting open.


Place a pin at the end of the buttonhole so you don't inadvertently cut past it. Cut the opening.Trim away stray garment threads being very careful not to cut the buttonhole thread. (Ask me how I know this!)

Sorry Dorothy. No video for this one.

A Fix for Gaping Armholes or Necklines.

I alreadyh ave covered this topic in another post so please click here for that information.

Again I do hope this has helped someone to improve their sewing skills. I would really appreciate some comments so that I know if it is worthwhile to continue with these lessons as they can be quite time consuming.

Hoping to hear from you,


Sunday, June 15, 2014

Lesson 5...Sway Back Adjustment and Over lapped Zipper

A little late with this, this week!

Lesson 5...Sway Back Adjustment

If your tops or jackets bunch up above the waist like this in the back


 then you need to do a very simple adjustment that will make such a nice difference..Here's what to do.

Step1...If possible , have someone fold the excess fabric and measure the depth of the fold.

Step 2...Draw a line across the back somewhere above the waistline. Draw a second line above it that represents the amount of this measurement.

Step 3.... Either cut along the first line and place the bottom part along the second line or fold the pattern by joining the two lines together , fold up and tape.   (Does that make sense?). here, I've cut and moved up the bottom part.


Step 4...Your back side seam will now be shorter than the front side seam. Run a line of stay stitching 1/2' from the seam line just along where you altered the back. Make five clips 3/8" deep from the cut edge. This will help you stretch the back seam to fit the front seam.


NOTE: when sewing the front and back side seams together, place the front against the feed dog and the back on top. The feed dogs will take care of the excess length of the front. This is a great thing to know whenever you are trying to ease a longer seam into a shorter one!

Having said that , if you take off more than 1/2", you'll have a hard time to fit the back to the front at the side seams . Keep in mind that...

...Peggy Sagers of Silhouette Patterns wants you to shorten the front pattern piece as well as the back piece.

...Sandra Betzina of Power Sewing  does it the way I described it.

...Linda Maynard at Craftsy  tapers the adjustment to nothing at the side seams.

...then try the different methods and see which one works for you.


Demonstration : Lapped Zipper Insertion

1... Fuse 1" wide strips of interfacing to the seam allowance of each side of the garment . Machine baste the seam to the marking for the bottom of the zipper and finish the seam with regular stitches.
Press open the seam


2... undo basting stitches. Pin, hand baste or use Wonder Tape to affix the left side of the zipper to the edge of the left side of the seam. Using a zipper foot,stitch as close as possible to the zipper teeth.

3...Bring the right side of the seam over  to the left side so that it overlaps the zipper and the seam.
Pin , hand baste or use wonder Tape to hold it in place. Sew close to the zipper teeth on the right side  and across the bottom of the zipper to join the seam on the left side.


This zipper insertion method is great for dresses, skirts and pants that open on the side seam.

What really helps to achieve a great looking zipper is the use of fusible interfacing to stabilize the seam. It makes all the difference! You should try it!

This coming week, I'll share with you my tips on sewing darts and on achieving successful buttonholes. Please come back in a few days to check it out.


Wednesday, June 4, 2014

Lesson 4 Narrow shoulder Adjustment

This week's lesson was a simple one and an easy adjustment needed by many people because pattern companies  seem to think we all have wide shoulders.

Lesson 4...Narrow Shoulders Adjustment

Measure the back bodice pattern piece from center back to just inside the seam allowance at the shoulder. Double this number. This gives you the shoulder width of the garment you are going to make.
Compare the number to your own shoulder width.  The difference divided by two is what you will decrease the pattern  shoulder by.  

Step 1...You will do this to both the front and back bodice pieces.
             Draw a line parallel to the grain line from mid shoulder to about half way down the                          armscye (armhole). Draw a second line at right angle to this one to the armscye (armhole).


Step 2... Measure from the first line the amount you are decreasing by and draw a line as in the                    photo below.

Step 3...Cut out the  piece formed by the first two lines   (I forgot to label the lines ) and lay it                     along the third line.


Step 4... Slip some paper under the pattern. With your French Curve  (or a bowl would work ),                     smooth armscye.


 You can see that you gain a little in the upper part and lose a little in the lower part . That will not affect the fit of the sleeve which you do not have to alter at all.

For Wide Shoulder Adjustment, you would reverse this process.


Demonstration: Inserting a zipper

I'm only showing a regular zipper and not the invisible zipper at this time.

A.For a center applied zipper;

1. Cut two strips of fusible interfacing 1" wide and 1"longer than the length of your zipper. Fuse to the seam allowance


2. Sew the seam using  basting stitches to the the end of the zipper placement notch  and changing to a regular stitch to complete the rest of the seam. Press the seam open


3. Either pin or using Wonder Tape which is a wash away, thus temporary, fusible tape, and with the zipper face down, affix the zipper exactly over the "ditch" of the seam.The top of the zipper should be just below the neckline seam.


                                       NOTE: I cut off about 1/4" of the zipper tape because I don't like to enclose it in the neckline seam as it is too bulky.)


4.  Without opening the seam, and using a zipper foot, sew  as close to the zipper teeth as you can .   You will have to move the zipper head out of the way so the seam will have to be open at that     spot. (Be sure to leave the needle down) .Then move it back  again and continue to the bottom, sew across the bottom and sew the other side the same way as the first.


Your finished zipper will look like this. Well I didn't press or open the top of the seam but you get the idea.


This method is used mostly at the center back seam of dresses or skirts.

Next week, I'll show the  lapped zipper method.
I hope this was useful to someone!


Wednesday, May 28, 2014

Sewing Class... Lesson 3

I only have three students in my class but ,for me, that's an ideal number. I'm not in it for the money but for the sheer joy of sharing my love of sewing.

I started in September with these same ladies . I wasn't sure how to go about teaching sewing so I just winged it. Everyone worked on a project of their choice and I taught about choosing patterns and fabric, I took their measurements and I altered their patterns for them. I covered such basics as using 5/8 " seam allowances, etc. This session lasted about three months until winter put a stop to it.

This time around, the teacher in me took over and  I decided that the classes should have a little structure  so I decided I would start each night with a simple pattern alteration lesson. Each of the ladies need a Full Bust Adjustment on their bodice patterns , so that's why I started with the two previous and this week's topic. Now, each lady can do her own alteration.

I also do a demonstration of a specific technique such as the Hong Kong finish ,which I did because of a request by Dorothy,  Stitch in the Ditch, and setting in a sleeve. Next week I'll demonstrate inserting a zipper. I also review things learned in the fall as the need arises. This all takes about a half hour and then everyone gets busy.

Full Bust Adjustment on Princess Seamed Garments  (Simplified Version )

Step 1...Draw a line across both pieces of  the bodice about half way between the two notches on each piece.


Step 2... On the front  side bodice piece. cut along the line to but not through the side and spread open 1/2" for each cup size above a B cup. Using a French Curve, join the  line where it was spread apart .


Step 3...  On the center front bodice piece, cut along the line and through each side. Spread apart the same amount that was spread for the side front . True each side edge.
.
 You didn't increase the pattern at the side seam so it is still the same length as the back side seam.                                                                                                
                                                                                                                                                                                                                                                     
Your pattern will now fit nicely over the bust area.


Note: This method works for me as well as my students. It may not provide enough room over the bust if you are very large in that area. You would need to do the slash and spread method. Please let me know if you would like me to show how to do that.


Demonstration... Setting in a Sleeve  ( so sorry about the quality of these photos!!!)

1.  Sew two rows of basting stitches from just before and just after the front and back notches on the sleeve cap.using the largest stitch length on your sewing machine Sew the first one at 5/8 " from the edge and the second row about 1/8" on the inside of the first one.
Be sure that you have marked the front and back sleeve notches as well as the shoulder dot.


2.  Sew the sides of the sleeve together. Draw up both rows of the basting stitches
     and distribute the fullness evenly along the cap of the sleeve between the notches and beyond if     necessary.. Be careful that there are no lumps and that it is as smooth as possible.


3...Pin the sleeve matching the shoulder at the dot  and at the under arm seam. These are the two most important places and you must match these two points.


4..Pin the rest of the sleeve smoothing the gathers as you go and avoiding clusters  of stitches. Don't worry if you do not match the notches perfectly. It's better to go beyond the notches than to have a sleeve that looks puckered or gathered on the outside.


                       Your sleeve will look like this. I know it looks puckered but it will be OK.


5. Sew with the sleeve side up and be careful to sew exactly at 5/8". ( Bad pic! ) I start sewing at one of the notches.


6...Reinforce the seam between the notches by sewing about 1 8``on the inside of the seam.


   7...  Trim the seam between the notches to about 1 4``. You don`t trim the rest of the sleeve seam.
      Press the sleeve lightly toward the sleeve


And that`s all there is to it ! Most of the time , your sleeve will be pucker free. The problem arises when the sleeve has too much ``ease``. But that`s another story for another tim

Check back in next week when I`ll be showing how to narrow a shoulder and demonstrating inserting a zipper.