We're nearing the end of he sewing classes until the fall. For the past two weeks, I've shared techniques that are useful to a sewist and am combining them in this week's post.
Techniques for Successful Darts
1. Mark the dart clearly with chalk or some other type of marker. For bust darts mark the beginning of the dart by making little clips in the side seam.
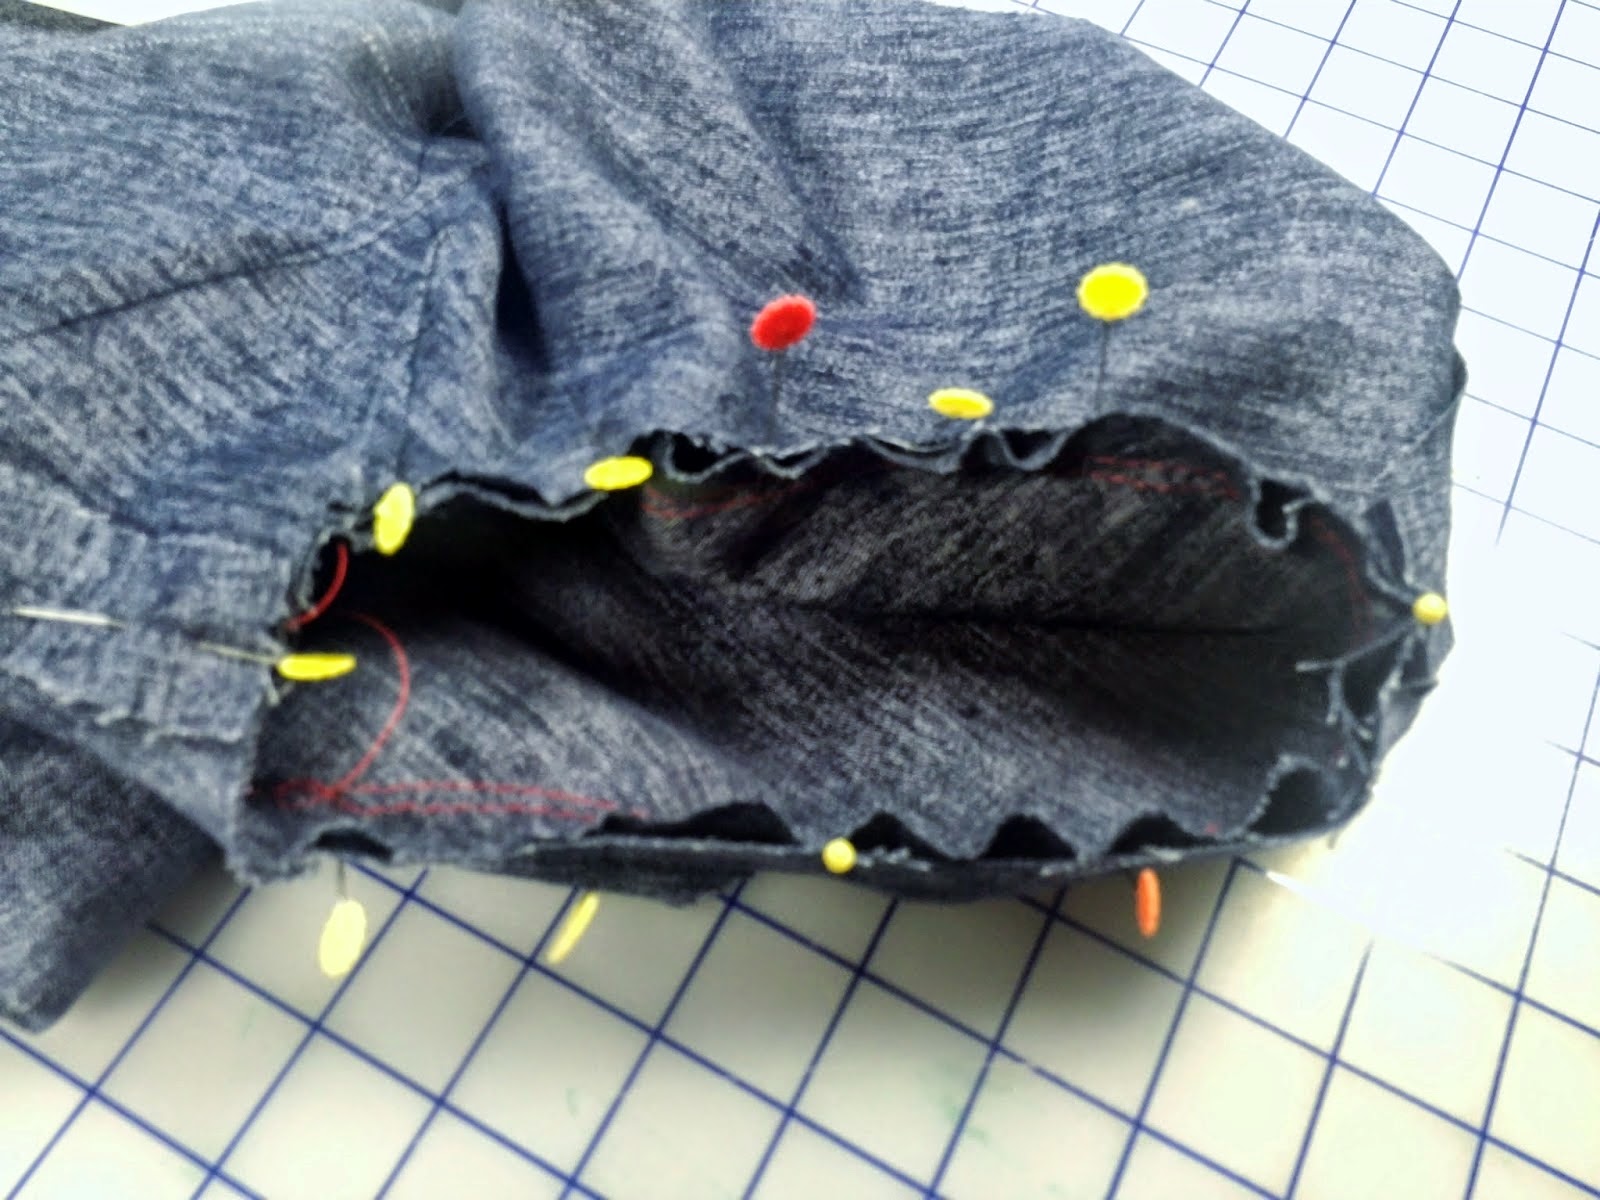
2. To pin, place your pin in one side and come out the other side.Don't close the dart yet.Go on to the next pin and so on until you get to the point. The photos should help illustrate what I'm trying to say.
3. Bring the dart together at each pin by pinching the sides together .
I begin to sew at the wide side of the dart. Some prefer to start at the point.
It's important to aim toward the point of the dart as soon as you begin the sewing process.
and that the last little bit before the end of the point is very narrow. Sew slowly!
4. Sew along the legs of the dart until you have about an inch left before the point. Reduce the stitch length to a very small stitch. I use 1.5 stitch length. Finish the dart making sure the last half inch is very narrow. Sew off the fabric. Don't back stitch. The small stitch length makes it so you don't have to knot your threads.
When sewing "fish eye" darts ( the kind that has a point at each end usually used to define the waist in both the front and back of a bodice) , it's best to start in the middle of the dart and sew to each end. This takes two steps but is worth it to get a nice skinny point at each end.
Waist darts are pressed toward the center front or back and bust darts are pressed downward.
Here is an example of one dart sewn correctly and another that has too wide a point at the end. Notice the difference after they are pressed.
For those of you (Dorothy) who prefer to learn through video, I found this one on line by Sure Fit Designs on darts.
My Techniques for Sewing Buttonholes.
It is very important to make a sample buttonhole or two on scrap fabric that has the same finish as your garment. If your garment has a facing ,your sample should also have a facing and the seam which joins the facing to the garment should be trimmed.
The rule of thumb is to make vertical buttonholes for shirts and blouses. and horizontal buttonholes for jackets and coats.
1. Apply fusible or sew-in interfacing behind the area where your buttonholes will be sewn.
2. Use a new needle on your machine. A Sharp needle #70/10 is a good choice. You could go smaller for lightweight fabric.
3. Mark the placement of your buttonholes with a pin to begin with
4. Wrap and pin pieces of tear away stabilizer over the area of each buttonhole.
5. Mark each buttonhole 3/8" to 1/2" from the outside of the garment as in the photo below. The long line does not indicate the length of the buttonhole unless you don't have an automatic buttonhole feature on your machine. The line is to keep you stitching straight once you start sewing.
The automatic buttonhole foot will make your buttonhole to the size of your button which is placed in the back of the foot. ( I find it will make it a little too long so I take the button out and lessen the length by pushing in a little)
If you do not have an automatic buttonhole foot, the buttonhole should be the width of your button plus 1/8" or the thickness of the button.
As much as possible, let your machine do it's job without touching the garment too much. Sometimes you might have to gently straighten it but the electronic mechanism does not like to be tampered with!
6.After your buttonholes are sewn , tear away the stabilizer and run a line of Fray Check along the opening. Allow this to dry before cutting open.
Place a pin at the end of the buttonhole so you don't inadvertently cut past it. Cut the opening.Trim away stray garment threads being very careful not to cut the buttonhole thread. (Ask me how I know this!)
Sorry Dorothy. No video for this one.
A Fix for Gaping Armholes or Necklines.
I alreadyh ave covered this topic in another post so please click here for that information.
Again I do hope this has helped someone to improve their sewing skills. I would really appreciate some comments so that I know if it is worthwhile to continue with these lessons as they can be quite time consuming.
Hoping to hear from you,
In this blog ... * I want to teach someone who wants to learn to sew but has no one to show them how. * I want to instill in someone the love of sewing * I want to teach them to want to go that extra step to achieve a garment that is special and professional looking.
Tuesday, June 24, 2014
Sunday, June 15, 2014
Lesson 5...Sway Back Adjustment and Over lapped Zipper
A little late with this, this week!
Lesson 5...Sway Back Adjustment
If your tops or jackets bunch up above the waist like this in the back
then you need to do a very simple adjustment that will make such a nice difference..Here's what to do.
Step1...If possible , have someone fold the excess fabric and measure the depth of the fold.
Step 2...Draw a line across the back somewhere above the waistline. Draw a second line above it that represents the amount of this measurement.
Step 3.... Either cut along the first line and place the bottom part along the second line or fold the pattern by joining the two lines together , fold up and tape. (Does that make sense?). here, I've cut and moved up the bottom part.
Step 4...Your back side seam will now be shorter than the front side seam. Run a line of stay stitching 1/2' from the seam line just along where you altered the back. Make five clips 3/8" deep from the cut edge. This will help you stretch the back seam to fit the front seam.
NOTE: when sewing the front and back side seams together, place the front against the feed dog and the back on top. The feed dogs will take care of the excess length of the front. This is a great thing to know whenever you are trying to ease a longer seam into a shorter one!
Having said that , if you take off more than 1/2", you'll have a hard time to fit the back to the front at the side seams . Keep in mind that...
...Peggy Sagers of Silhouette Patterns wants you to shorten the front pattern piece as well as the back piece.
...Sandra Betzina of Power Sewing does it the way I described it.
...Linda Maynard at Craftsy tapers the adjustment to nothing at the side seams.
...then try the different methods and see which one works for you.
Demonstration : Lapped Zipper Insertion
1... Fuse 1" wide strips of interfacing to the seam allowance of each side of the garment . Machine baste the seam to the marking for the bottom of the zipper and finish the seam with regular stitches.
Press open the seam
2... undo basting stitches. Pin, hand baste or use Wonder Tape to affix the left side of the zipper to the edge of the left side of the seam. Using a zipper foot,stitch as close as possible to the zipper teeth.
3...Bring the right side of the seam over to the left side so that it overlaps the zipper and the seam.
Pin , hand baste or use wonder Tape to hold it in place. Sew close to the zipper teeth on the right side and across the bottom of the zipper to join the seam on the left side.
Lesson 5...Sway Back Adjustment
If your tops or jackets bunch up above the waist like this in the back
then you need to do a very simple adjustment that will make such a nice difference..Here's what to do.
Step1...If possible , have someone fold the excess fabric and measure the depth of the fold.
Step 2...Draw a line across the back somewhere above the waistline. Draw a second line above it that represents the amount of this measurement.
Step 4...Your back side seam will now be shorter than the front side seam. Run a line of stay stitching 1/2' from the seam line just along where you altered the back. Make five clips 3/8" deep from the cut edge. This will help you stretch the back seam to fit the front seam.
NOTE: when sewing the front and back side seams together, place the front against the feed dog and the back on top. The feed dogs will take care of the excess length of the front. This is a great thing to know whenever you are trying to ease a longer seam into a shorter one!
Having said that , if you take off more than 1/2", you'll have a hard time to fit the back to the front at the side seams . Keep in mind that...
...Peggy Sagers of Silhouette Patterns wants you to shorten the front pattern piece as well as the back piece.
...Sandra Betzina of Power Sewing does it the way I described it.
...Linda Maynard at Craftsy tapers the adjustment to nothing at the side seams.
...then try the different methods and see which one works for you.
Demonstration : Lapped Zipper Insertion
1... Fuse 1" wide strips of interfacing to the seam allowance of each side of the garment . Machine baste the seam to the marking for the bottom of the zipper and finish the seam with regular stitches.
Press open the seam
2... undo basting stitches. Pin, hand baste or use Wonder Tape to affix the left side of the zipper to the edge of the left side of the seam. Using a zipper foot,stitch as close as possible to the zipper teeth.
3...Bring the right side of the seam over to the left side so that it overlaps the zipper and the seam.
Pin , hand baste or use wonder Tape to hold it in place. Sew close to the zipper teeth on the right side and across the bottom of the zipper to join the seam on the left side.
This zipper insertion method is great for dresses, skirts and pants that open on the side seam.
What really helps to achieve a great looking zipper is the use of fusible interfacing to stabilize the seam. It makes all the difference! You should try it!
This coming week, I'll share with you my tips on sewing darts and on achieving successful buttonholes. Please come back in a few days to check it out.
Wednesday, June 4, 2014
Lesson 4 Narrow shoulder Adjustment
This week's lesson was a simple one and an easy adjustment needed by many people because pattern companies seem to think we all have wide shoulders.
Lesson 4...Narrow Shoulders Adjustment
Measure the back bodice pattern piece from center back to just inside the seam allowance at the shoulder. Double this number. This gives you the shoulder width of the garment you are going to make.
Compare the number to your own shoulder width. The difference divided by two is what you will decrease the pattern shoulder by.
Step 1...You will do this to both the front and back bodice pieces.
Draw a line parallel to the grain line from mid shoulder to about half way down the armscye (armhole). Draw a second line at right angle to this one to the armscye (armhole).
Step 2... Measure from the first line the amount you are decreasing by and draw a line as in the photo below.
Step 3...Cut out the piece formed by the first two lines (I forgot to label the lines ) and lay it along the third line.
Step 4... Slip some paper under the pattern. With your French Curve (or a bowl would work ), smooth armscye.
You can see that you gain a little in the upper part and lose a little in the lower part . That will not affect the fit of the sleeve which you do not have to alter at all.
For Wide Shoulder Adjustment, you would reverse this process.
Demonstration: Inserting a zipper
I'm only showing a regular zipper and not the invisible zipper at this time.
A.For a center applied zipper;
1. Cut two strips of fusible interfacing 1" wide and 1"longer than the length of your zipper. Fuse to the seam allowance
2. Sew the seam using basting stitches to the the end of the zipper placement notch and changing to a regular stitch to complete the rest of the seam. Press the seam open
This method is used mostly at the center back seam of dresses or skirts.
Next week, I'll show the lapped zipper method.
I hope this was useful to someone!
Lesson 4...Narrow Shoulders Adjustment
Measure the back bodice pattern piece from center back to just inside the seam allowance at the shoulder. Double this number. This gives you the shoulder width of the garment you are going to make.
Compare the number to your own shoulder width. The difference divided by two is what you will decrease the pattern shoulder by.
Step 1...You will do this to both the front and back bodice pieces.
Draw a line parallel to the grain line from mid shoulder to about half way down the armscye (armhole). Draw a second line at right angle to this one to the armscye (armhole).
Step 2... Measure from the first line the amount you are decreasing by and draw a line as in the photo below.
Step 3...Cut out the piece formed by the first two lines (I forgot to label the lines ) and lay it along the third line.
Step 4... Slip some paper under the pattern. With your French Curve (or a bowl would work ), smooth armscye.
You can see that you gain a little in the upper part and lose a little in the lower part . That will not affect the fit of the sleeve which you do not have to alter at all.
Demonstration: Inserting a zipper
I'm only showing a regular zipper and not the invisible zipper at this time.
A.For a center applied zipper;
1. Cut two strips of fusible interfacing 1" wide and 1"longer than the length of your zipper. Fuse to the seam allowance
2. Sew the seam using basting stitches to the the end of the zipper placement notch and changing to a regular stitch to complete the rest of the seam. Press the seam open
3. Either pin or using Wonder Tape which is a wash away, thus temporary, fusible tape, and with the zipper face down, affix the zipper exactly over the "ditch" of the seam.The top of the zipper should be just below the neckline seam.
NOTE: I cut off about 1/4" of the zipper tape because I don't like to enclose it in the neckline seam as it is too bulky.)
4. Without opening the seam, and using a zipper foot, sew as close to the zipper teeth as you can . You will have to move the zipper head out of the way so the seam will have to be open at that spot. (Be sure to leave the needle down) .Then move it back again and continue to the bottom, sew across the bottom and sew the other side the same way as the first.
Your finished zipper will look like this. Well I didn't press or open the top of the seam but you get the idea.
This method is used mostly at the center back seam of dresses or skirts.
Next week, I'll show the lapped zipper method.
I hope this was useful to someone!
Wednesday, May 28, 2014
Sewing Class... Lesson 3
I only have three students in my class but ,for me, that's an ideal number. I'm not in it for the money but for the sheer joy of sharing my love of sewing.
I started in September with these same ladies . I wasn't sure how to go about teaching sewing so I just winged it. Everyone worked on a project of their choice and I taught about choosing patterns and fabric, I took their measurements and I altered their patterns for them. I covered such basics as using 5/8 " seam allowances, etc. This session lasted about three months until winter put a stop to it.
This time around, the teacher in me took over and I decided that the classes should have a little structure so I decided I would start each night with a simple pattern alteration lesson. Each of the ladies need a Full Bust Adjustment on their bodice patterns , so that's why I started with the two previous and this week's topic. Now, each lady can do her own alteration.
I also do a demonstration of a specific technique such as the Hong Kong finish ,which I did because of a request by Dorothy, Stitch in the Ditch, and setting in a sleeve. Next week I'll demonstrate inserting a zipper. I also review things learned in the fall as the need arises. This all takes about a half hour and then everyone gets busy.
Full Bust Adjustment on Princess Seamed Garments (Simplified Version )
Step 1...Draw a line across both pieces of the bodice about half way between the two notches on each piece.
Step 2... On the front side bodice piece. cut along the line to but not through the side and spread open 1/2" for each cup size above a B cup. Using a French Curve, join the line where it was spread apart .
Step 3... On the center front bodice piece, cut along the line and through each side. Spread apart the same amount that was spread for the side front . True each side edge.
.
You didn't increase the pattern at the side seam so it is still the same length as the back side seam.
Your pattern will now fit nicely over the bust area.
Note: This method works for me as well as my students. It may not provide enough room over the bust if you are very large in that area. You would need to do the slash and spread method. Please let me know if you would like me to show how to do that.
Demonstration... Setting in a Sleeve ( so sorry about the quality of these photos!!!)
1. Sew two rows of basting stitches from just before and just after the front and back notches on the sleeve cap.using the largest stitch length on your sewing machine Sew the first one at 5/8 " from the edge and the second row about 1/8" on the inside of the first one.
2. Sew the sides of the sleeve together. Draw up both rows of the basting stitches
and distribute the fullness evenly along the cap of the sleeve between the notches and beyond if necessary.. Be careful that there are no lumps and that it is as smooth as possible.

3...Pin the sleeve matching the shoulder at the dot and at the under arm seam. These are the two most important places and you must match these two points.
Your sleeve will look like this. I know it looks puckered but it will be OK.
5. Sew with the sleeve side up and be careful to sew exactly at 5/8". ( Bad pic! ) I start sewing at one of the notches.
7... Trim the seam between the notches to about 1 4``. You don`t trim the rest of the sleeve seam.
Press the sleeve lightly toward the sleeve
Check back in next week when I`ll be showing how to narrow a shoulder and demonstrating inserting a zipper.
Tuesday, May 20, 2014
Sewing Class. ...Lesson 2
At this week's sewing class, I covered the Full bust Adjustment on a bodice that already has a dart and I explained what Stitch in the Ditch is and where it is useful.
Lesson 2: FBA with Existing Dart.
This adjustment is very much like the last lesson but we have to deal with the dart that is already there.
Step 1... Locate bust point by measuring from shoulder seam at neck to center of bust
(nipple). Draw a small circle (A) on bodice front pattern to represent your measurement.
Step 2... .Draw a line from bottom of bodice front parallel to center front line to the bust point. (AB)
Draw a line from bust point to the notch on the armscye (armhole). (AC)
Draw a line joining the mid point of the dart along the bodice side to the bust point. (AD)
Step 3... Cut along the first line to the bust point and from the bust point to but not through the armscye.
Spread the pattern 1/2 inch for each cup size above a B cup at the bust point. Ex...for a D cup ,you would spread 1 inch.
Step 4... Cut along line AD ( but not through the bust point) then straighten the bodice side and join the bottom to the center front piece at (B). This will increase the bust dart.
At bottom , you will need to even out and add to the bottom of center front which will give you the extra length needed so your top won't hike up.
Step 5... Slip paper under the pattern. From mid point of new dart, draw a line to the original bust point. Measure back about 2" along this line. Draw a line from this point to each of the original legs on bodice side. This is the new dart .
Step 6... To even out the side of the bodice, fold the dart shut and down. Draw a smooth line with French curve and trim. When the dart is opened ,it will stick out along the side as it should.
Again, your pattern should now fit over your bust.
Technique Demonstration: Stitch in the Ditch.
Click here for instructions on how to do this very useful stitch.
Where you would Stitch in the Ditch;
1.To secure the inside of a waistband or cuffs on a shirt and to eliminate bulk.
2. At shoulder and underarm seams to secure facings so they will stay to the inside of a garment.
3. At side seams of waistbands which have been elasticized to keep elastic from shifting and rolling. ( no pic)
4. To join upper and under collar together on a jacket or other garment. (See jacket here)
Of course there are other places you might stitch in the ditch. I'll leave you to find them for yourself!
I hope this is useful to you. Please let me know if something isn't clear or doesn't make sense.
Come back next week for another lesson and technique demonstration.
Lesson 2: FBA with Existing Dart.
This adjustment is very much like the last lesson but we have to deal with the dart that is already there.
Step 1... Locate bust point by measuring from shoulder seam at neck to center of bust
(nipple). Draw a small circle (A) on bodice front pattern to represent your measurement.
Step 2... .Draw a line from bottom of bodice front parallel to center front line to the bust point. (AB)
Draw a line from bust point to the notch on the armscye (armhole). (AC)
Draw a line joining the mid point of the dart along the bodice side to the bust point. (AD)
Step 3... Cut along the first line to the bust point and from the bust point to but not through the armscye.
Spread the pattern 1/2 inch for each cup size above a B cup at the bust point. Ex...for a D cup ,you would spread 1 inch.
At bottom , you will need to even out and add to the bottom of center front which will give you the extra length needed so your top won't hike up.
Step 5... Slip paper under the pattern. From mid point of new dart, draw a line to the original bust point. Measure back about 2" along this line. Draw a line from this point to each of the original legs on bodice side. This is the new dart .
Step 6... To even out the side of the bodice, fold the dart shut and down. Draw a smooth line with French curve and trim. When the dart is opened ,it will stick out along the side as it should.
Again, your pattern should now fit over your bust.
Technique Demonstration: Stitch in the Ditch.
Click here for instructions on how to do this very useful stitch.
Where you would Stitch in the Ditch;
1.To secure the inside of a waistband or cuffs on a shirt and to eliminate bulk.
2. At shoulder and underarm seams to secure facings so they will stay to the inside of a garment.
3. At side seams of waistbands which have been elasticized to keep elastic from shifting and rolling. ( no pic)
4. To join upper and under collar together on a jacket or other garment. (See jacket here)
Of course there are other places you might stitch in the ditch. I'll leave you to find them for yourself!
I hope this is useful to you. Please let me know if something isn't clear or doesn't make sense.
Come back next week for another lesson and technique demonstration.
Subscribe to:
Posts (Atom)